As a company begins to scale, it will start amassing data at a much faster rate. It’s essential to plan for emergencies with a proper backup and restore procedure for this data.
Just imagine how disastrous having all your user data being wiped out without a plan for how to restore it to a workable state.
Today I’m going to guide you through a simple backup and restore plan utilizing some technologies we use here at Justuno. CockRoachDB, Google Cloud Storage, and Golang a Google created a programming language.
If you haven’t heard of CockRoachDB but have worked with other database systems such as Postgres or MySQL, you’ll feel right at home. CockRoach has the added benefit of being a distributed system according to GitHub it’s “built on a transactional and strongly-consistent key-value store. It scales horizontally, survives disk, machine, rack, and even datacenter failures with minimal latency disruption and no manual intervention and supports strongly-consistent ACID transactions.”
If you want to follow along go ahead and head over to CockRoach install guide and get set up with a free 30 day trial of Enterprise edition locally. Also, you’ll need to sign up for a Google Cloud Storage account and get Golang installed on your system.
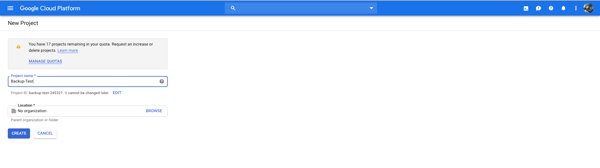
Once you’re set up, head to your GCS console and start by creating a project.
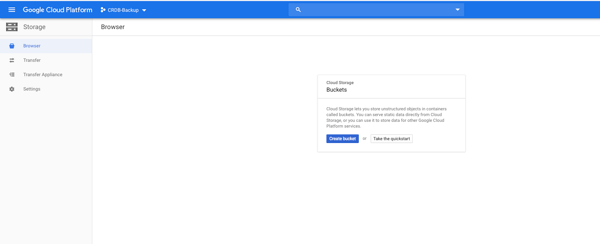
Afterward, you’ll see a screen that says create a bucket, click that option.
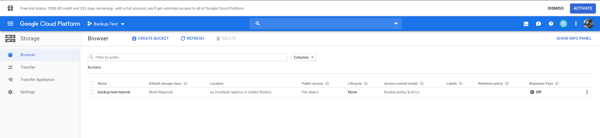
You will need to pick a unique name, a region, location, and select set object-level and bucket-level permissions. If successful, you should see an image similar to mine below. Again your settings will differ depending on your use case but to follow along, using the defaults is fine.
Next, you’ll need to address some database configuration settings that will enable the CockRoach backups to upload to your Google cloud storage directly. If you’re not interested in utilizing GCS. CockRoach also supports, Amazon, Azure, Http and NFS/Local backup file URLs. More info can be found here.
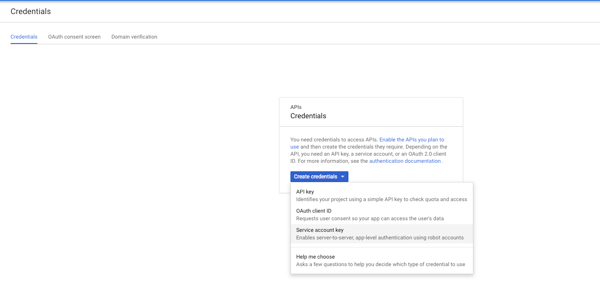
Open the menu located on the left side of your screen and select APIs & Services and the option Credentials. You should now see a screen that says Create Credentials. For this purpose, we are interested in a service account key.
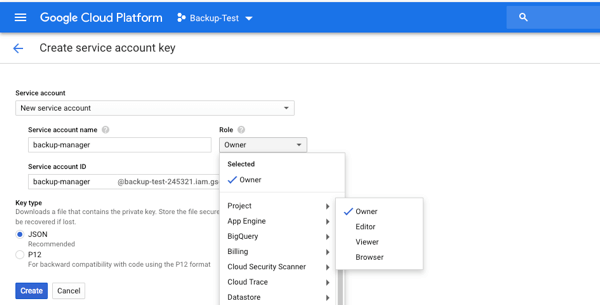
On the next screen, you’ll select New Service account; create a service account name; select role type and ensure you select JSON as the key type. For this particular tutorial, I’m going to choose Project and Owner. In a production environment, you’ll want a more restrictive role.
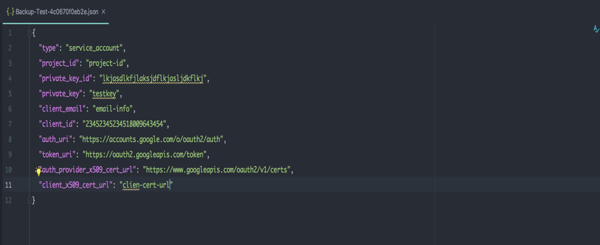
Once done, an automatic download should begin with your JSON content, which should look similar to the picture below.
Next, using the tool of your choice connect to your cockroach instance, I prefer SQLPro for Postgres. You can connect to your Cockroach instance utilizing most Psql drivers. If you want to connect through your terminal if running a local instance, you can run:
=> cockroach sql –insecure –host=localhost
The first thing you will want to do is update your cloudstorage.gs.default.key with the contents of your JSON file.
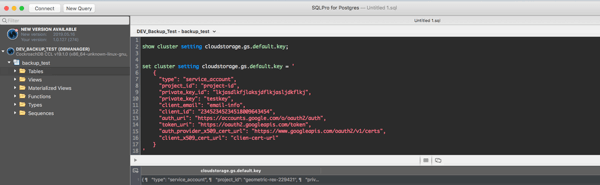
Check the current setting first, like in the image above:
SHOW CLUSTER SETTING cloudstorage.gs.default.key;
Next, I set the gs.default.key to the contents of my JSON file:
SET CLUSTER SETTING cloudstorage.gs.default.key = ‘Json Contents’
Now that we’ve gone through the setup and configuration, it’s time to get into the fun stuff, the actual code.
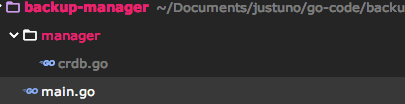
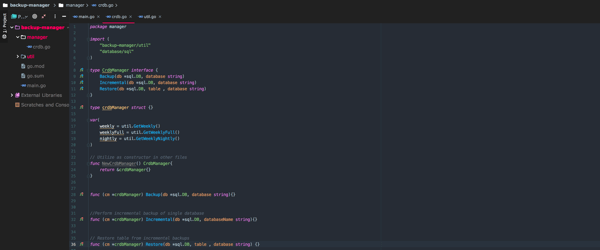
Start by creating a Go project; I’ve named mine backup-manager. Next, create a main.go file in your root directory a manager directory and file named crdb.go in your manager directory. The manager directory will hold the meat of the application logic, and your file structure should look similar to mine.
Next, we’ll need to install a couple of packages, open your terminal, and navigate to the root of your project. Run the following:
go get “github.com/lib/pq”
go get “database/sql”
go get github.com/lib/pq
go get “cloud.google.com/go/storage”
go get “github.com/snabb/isoweek”
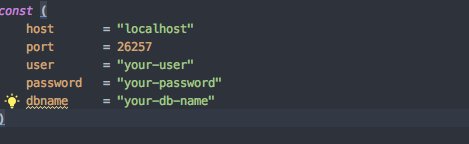
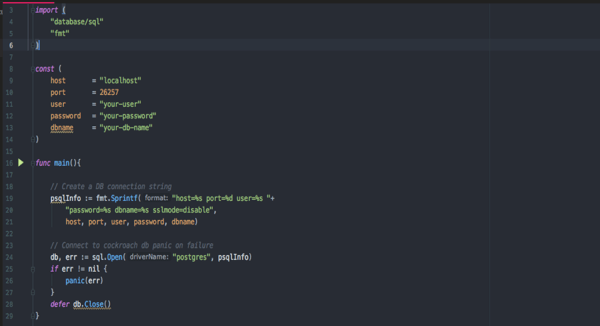
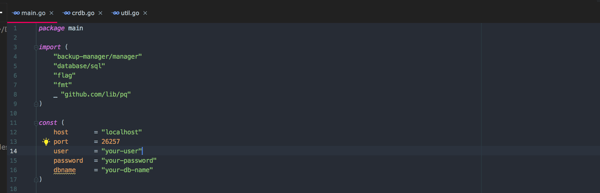
After installing these, we’ll set up some constants at the top of our file to establish our Database connection. These constants will be host, port, user, password, and dbname.
Inside of main we’ll use the constants we just set up to build a psql connection string and try to establish a connection to our database. If an error occurs, we panic out.
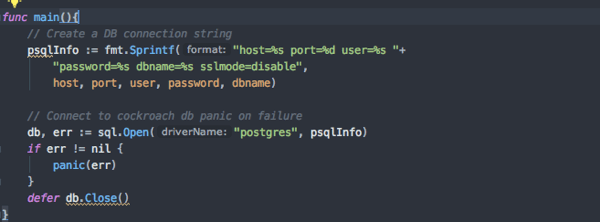
Your file should look similar to mine but with your constants matching your setup. Go ahead and execute your application by running the following in your terminal:
“go run main.go”
If no errors occur, you have a good connection.
Leave main.go for a moment and head over to the crdb.go file we created earlier. Copy what you see in the image below before we go over what’s happening.
First, declare a package name and the top of the file:
Package manager
Start by creating an interface named CrdbManager. If you’re not familiar with interfaces, they allow you to specify the behavior required. In this case, we are focused on backing up our data, performing incremental backups, and performing restores.

Next, create a: crdbManagerStruct{}

You can think of structs like objects in other languages. Usually, you would create a class then explicitly state that class would implement the created interface. But in Go you apply the methods with the syntax below and Go will infer your struct is of type interface.

Before we start on the backup code, there are a few quirks when dealing with Cockroach to keep in mind. Cockroach provides two forms of backup: Full and Incremental. Full backups are simplistic and require you to pass the database name and your google cloud storage location.
Ex: BACKUP DATABASE bank TO ‘gs://acme-co-backup/database-bank-2017-03-27-weekly’ AS OF SYSTEM TIME ‘-10s’;
Incremental backups can be a bit more tricky because they require listing all previous full and incremental backups. First, you must declare where your backup will be stored then list out all previous backups starting from your full then your next incremental
EX: BACKUP DATABASE bank TO ‘gs://acme-co-backup/db/bank/2017-03-29-nightly’ AS OF SYSTEM TIME ‘-10s’ INCREMENTAL FROM ‘gs://acme-co-backup/database-bank-2017-03-27-weekly’, ‘gs://acme-co-backup/database-bank-2017-03-28-nightly’;
With that said, it’s up to you to create a storage schema that will allow you to create the above Command dynamically. For this example, we’re going to create a schema that takes daily backups and the first backup of the week is a full backup and use a naming schema of year-month-day. For example, our first backup would be named: 2019-7-8-full, and the next day would be 2019-7-9-nightly. All the backups for the week will be stored under a weekly dir directory ending in “weekly” under that database name. For example:
2019-7-8-weekly/dbName/2019-7-8-full and nightly location
would be
2019-7-8-weekly/dbName/2019-7-9-nightly.
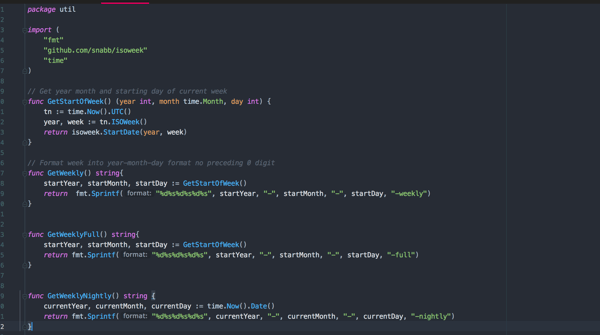
Now create a new directory in the root of our project named util and create a file named util.go; your directory structure should look like mine below.

Our util.go file will contain helpers that will auto-generate our weekly, nightly, and full values. Your util.go should look like the screenshot below.
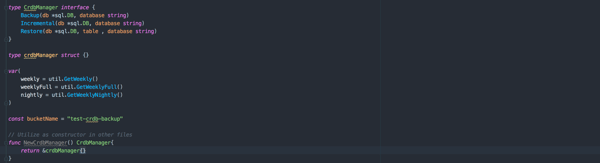
Let’s head back to our crdb.go file. We’ll need to add some imports, adjust your code to resemble the image below.

I’ve updated the CrdManager interfaces signatures to now except a DB instance and database name. I also created vars weekly, weeklyFull, and nightly by calling the util methods we created earlier plus a const that will hold our Google cloud backup name.
Now we can move on to the backup method.
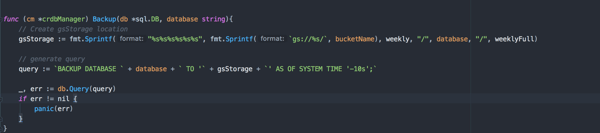
Our backup method will take a db instance value and the database we’re backing up as a parameter. Then we’ll generate the save location for the backup as discussed earlier. Remember, the weekly dir takes the name of the start of the week, all subsequent full and incremental are stored under that dir for the week. Your generated gsStorage location should look like the following:
gs://test-crdb-backup/2019-7-8-weekly/testdb/2019-7-8-full
Generate the full query to run, execute it, and panic if the query fails. Note that the query ends with:
`’AS OF SYSTEM TIME ‘-10S’;`
Cockroach recommends starting a backup from 10 seconds ago. Now we can move on to the incremental backup method.
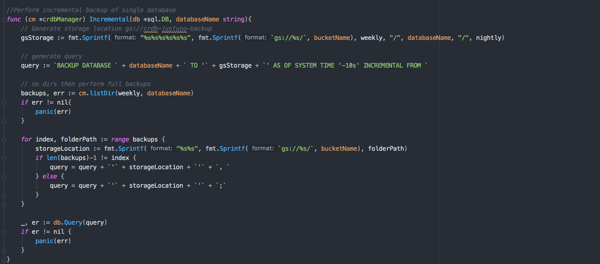
The incremental backup starts by generating our gcs incremental save location, like the one we just did. This time after creating query we’ll need a list of previous backups to produce the full query. This is done by calling listDir method and is examined last.
After going over the list of backups, you’ll finish the generate query and run it. If it fails panic, and eventually, your query should look similar to the one below:
BACKUP DATABASE bank TO ‘gs://test-crdb-backup/2019-7-8-weekly/testdb/2019-7-10-nightly’ AS OF
SYSTEM TIME ‘-10s’ INCREMENTAL FROM ‘gs://test-crdb-backup/2019-7-8-weekly/testdb/2019-7-8-full’,
‘gs://test-crdb-backup/2019-7-8-weekly/testdb/2019-7-9-nightly;
The restore method is next.
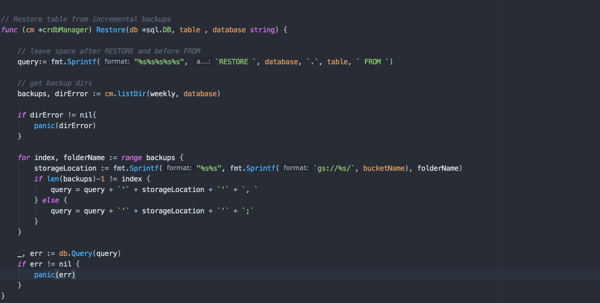
Restore is similar to the incremental backup. We’ll generate a query, then call list of dirs and appendour database listing to our original query. Afterward, run the query and panic if our query fails.
Remember for incremental and restores, the order of your backup listing does matter. Start with your full backup then the next Incremental backup and then following incremental backups. If you don’t order them correctly, the restore and incremental backups will fail. If you want more information on restore functions click here.
Now we’re moving on to our List listDir method.

First thing you will notice is listDir is not capitalized because lowercase methods are private in Go. Since listDir is a helper in our Interface methods, there’s no need for the method to be public.
First, we’ll start by creating a bucket object that we’ll use to query our storage objects. Next, construct the query pointing to our weekly backup for that particular database instance. From there, generate a slice of Dirs. Afterward, run a check to ensure that the full backup is the first listed in our slice and if not, reverse the slice.
I saw some weird behavior when listing Dirs in Google cloud storage. Sometimes the call would return the list in ascending order then descending. Make sure you take your time with this method, focusing on double-checking your listing of dirs returns in the correct order.
Another approach could be to alter your naming schema and add a timestamp as part of the dir name. In that situation, you could then iterate over your dir listing and ensure your files are correctly ordered by time ascending. The listDir method will depend heavily upon your schema storage design. Again, if your listDir is not correctly ordered, your restore and incremental backups will fail!
Let’s take one last look at the main.go file.
Make sure to update your list of imports and that your constants are all filled out appropriately. Underneath const add the following code.
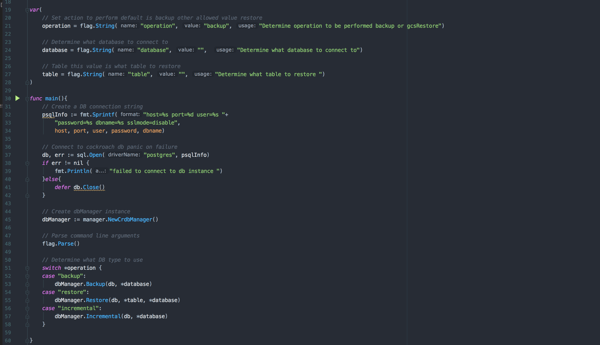
First, create a grouping of vars for the command line arguments that dictate the logic of our application. One command flag is “operation,” with the value options of backup, restore, or incremental. The other is a database for your database name and table if calling the restore operation. Our db connection logic stays the same, and below that we create our dbManager instance to parse the command line arguments we passed to the application. Then execute backup restore or incremental depending on the operation called. If you don’t have experience with command-line flags, you can find more info here. When you run the application, your command should look like the following:
go run main.go -operation=backup -database=dbName
Final thoughts
This is not a production-ready application. It’s just a demo to get your thought process going and ideally save you time with configuration. Throughout this application, when we encountered any form of error, we merely called panic, which forces the application to exit. In a production environment, you would want to handle this differently, adding some form of logging or type of notification logic like an email or SMS event to let you know the status of the job.
This application assumes that you’re manually passing every database name into your application. While this could be done by writing a script that passes these values and then sets up a cron job to run the script, there’s a better approach. My suggestion is to write code executing a backup of every database in your Cockroach instance by calling “show databases” iterating through the return result and calling your backup method. Don’t forget that you can set up a cron job to run your Go app every night.
Lastly, it’s important to note that when running restore on a table, Cockroach assumes your table does not exist. If you attempt to run restore on a table and the table’s present you will receive an error. Keep in mind the order of running restore on tables with foreign key restraints. If you attempt to restore a table that has a foreign key restraint, but your other table does not exist, you’ll run into issues.
You can run your restore by adding:
`With Skip_missing_foreign_keys’
This will drop foreign key constraints, but make sure to add back in the foreign key restraints afterward.
Hopefully, this post shed some light on how to back up and restore your company’s data in the event of an emergency. Making sure you’re ready and prepared will help minimize the impact and get you back up and running quickly.